The Arrival
You will arrive on a beach. Walk to the right and there will be a building
that says Party Time Tower. This is a multi-player room. To do this
adventure, keep on walking. There is a crying lady standing outside of a
building called, Pendulum’s Lab. Click on her and she will tell you
about your mission. When she goes into the building, follow her inside.
Walk to the right until you see the lady again. Talk to her again. Now she
will give you a mission printout that you can read in your items inventory. If
you want to learn more about the Future Machine, talk to the man that’s wearing
glasses and an apron.
To power up the Future Machine, go left and down to find the power supply.
Push it together by walking towards it until it closes to activate it.
The Future
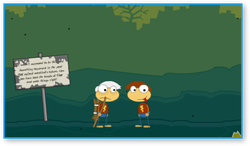
Walk back to the door of the Future Machine, which will be pulsing blue,
and click on it to enter. The future will be in ruins. You will meet yourself
but 50 years older in the future. Talk to future you and you will get a special
time travel device that looks like a golden stopwatch. There will also be a sign
in the future that says:
It wasn’t supposed to be this way! Something happened in the past that
ruined mankind’s future. Can you turn back the hands of time and make things
right?”
Tips and Help
When you finish helping everyone, go back into the future. Use the hover tube
and monorails to get to your future self’s SkyHome. There, talk to your future
self and they will give you the Time Twisted Island Medal.
Time Periods
Who Needs What
Where Things Are
You will arrive on a beach. Walk to the right and there will be a building
that says Party Time Tower. This is a multi-player room. To do this
adventure, keep on walking. There is a crying lady standing outside of a
building called, Pendulum’s Lab. Click on her and she will tell you
about your mission. When she goes into the building, follow her inside.
Walk to the right until you see the lady again. Talk to her again. Now she
will give you a mission printout that you can read in your items inventory. If
you want to learn more about the Future Machine, talk to the man that’s wearing
glasses and an apron.
To power up the Future Machine, go left and down to find the power supply.
Push it together by walking towards it until it closes to activate it.
The Future
Walk back to the door of the Future Machine, which will be pulsing blue,
and click on it to enter. The future will be in ruins. You will meet yourself
but 50 years older in the future. Talk to future you and you will get a special
time travel device that looks like a golden stopwatch. There will also be a sign
in the future that says:
It wasn’t supposed to be this way! Something happened in the past that
ruined mankind’s future. Can you turn back the hands of time and make things
right?”
Tips and Help
When you finish helping everyone, go back into the future. Use the hover tube
and monorails to get to your future self’s SkyHome. There, talk to your future
self and they will give you the Time Twisted Island Medal.
Time Periods
- 2009 AD – LAB – Main Street
- 0328 BC – man in golden armor – Ancient Greece
- 0831 AD – man in Viking suit – Vikings
- 1387 AD – lady with pink turban – Mali Empire
- 1516 AD – bearded man – Da Vinci’s Workshop
- 1519 AD – man with headdress – Aztec Empire
- 1593 AD – armored Asian man – Great Wall of China
- 1776 AD – man with black hat – The Graff House
- 1805 AD – man with beaver cap – Lewis and Clark
- 1877 AD – young man – Edison’s Workshop
- 1882 AD – French man – Statue of Liberty
- 1953 AD – man in blue hoodie – Mount Everest
Who Needs What
- Ancient Greece: Golden Vase
- Vikings: Thor’s Amulet
- Mali Empire: Salt Rocks
- Da Vinci’s Workshop: Notebook
- Aztec Empire: Sun Stone Piece
- Great Wall of China: Stone Bowl
- The Graff House: Declaration of Independence
- Lewis and Clark: Peace Medal
- Edison’s Workshop: Phonograph
- Statue of Liberty: Statue Model
- Mount Everest: Climbing Goggles
Where Things Are
- Climbing Goggles: In the Aztec Empire, and a guard is wearing them, the
guard will give them to you if you are wearing the Warrior’s Mask( see last
list). - Statue Model: The very top peak of Mount Everest you can get to.
- Phonograph: On top of the treasury building( the guards are standing in
front of it) in Ancient Greece. You have to climb up onto the building that the
Oracle(a person) is in. It helps to have the Glider when getting it( see last
list). - Peace Medal: Hanging on the pulley system in Da Vinci’s Workshop. First
climb onto the middle platform, making the top one come closer so you can jump
on it. Get on the top platform, you will go down but the bottom platform will
come out. Jump onto the bottom platform and from there jump and try to touch the
shiny silver circle. If you touch it, then you’ve got the Peace Medal. - Declaration of Independence: In the Mali Empire( watch out for snakes) there
will be a place called “Timbuktu Inn”. A document merchant is in there. Piece
together a puzzle for him to get the Declaration of Independence. - Stone Bowl: Go to Lewis and Clark’s campsite. There will be a tree that has
the words “Clark was here” cut into it. Climb the tree and wait for a beaver to
come out, he has the bowl on his head. - Sun Stone Piece: On top of Edison’s Workshop. Go to the left and jump on the
car. Click the circle-thingy that lights up and the car will go and stop under
the tree. Climb up the tree and onto the house. - Notebook: Go to the Statue of Liberty. Climb so your on the very top
platform of the wooden stilts. Jump to your left. You will land on a ledge. The
Notebook is on the ledge below that. - Salt Rocks: If you go to the Graff House and climb the tree, then jump onto
the roof, they are in a bag right there. - Thor’s Amulet: Go to the Great Wall of China and pass the construction zone.
A man will be wearing the amulet. If you beat him in a memory game he will
give it to you. - Golden Vase: This is
most definitely the hardest. Go to the Great Wall of China and pick up a barrel
of explosives. Go to where the Vikings are and climb onto the first cliff. Click
the rock-pile and run. It should blow up. Pick up the torch and go inside. You
only have a little while before your torch goes out to find the vase. It will
also go out if you step in water. - Clothes You Can Get:
- Warrior’s Mask: In the Aztec Empire there is an old warrior who wants to
retire. Talk to him and he’ll give his mask to you. - The Glider: Da Vinci gives it to you when you give him his notebook.
- The Viking Suit: It’s laying on the second cliff
where the Vikings are, use the Glider to get there.
Wimpy Wonderland

Wimpy Wonderland is the 18th island in Poptropica. It was
opened to general use on March 17, 2011. Early Access was for paid monthly
members was on March 14, 2011, but was extended to all players shortly
thereafter. The island is based on the "Diary of a Wimpy Kid" book series by
Jeff Kinney (a creator of Poptropica). The characters are all drawn as in the
book, so their appearances cannot be copied for Poptropica avatars. Almost all
of the island is done as black-and-white drawings, with some notable color
effects.
This solution contains spoilers. See the related question
for less detail.
The layout of the island is as follows
North
Main / Surrey St / Main Street / School / Leisure Towers / Whirley Street
Main Street and Surrey Street
1) Arrive on the island. Talk
to Greg Heffley, to find that school is canceled but that his parents are away
and his little brother Manny has run off. Follow him left, back to his house
(Surrey St.)
2) Investigate the house and get the Address Book and the page
from Greg's Journal. You cannot enter the garage where older brother Rodrick is
practicing. Greg is again preoccupied with a video game (Twisted Wizard).
3) Enter Manny's room and exit through the window. Follow his footprints to the
left, across the rooftops, to Rowley Jefferson's house, where Rowley says that
Manny took his rumble bike. The bike tracks lead to the right again.
4)
Catch up to Manny, and he leaves the bike for you to pick up, and climbs a tree.
Follow him up the branches until he reaches the top and jumps right, landing on
top of the kid's snowman. Pick up the snowman's carrot nose.
5) Chase Manny
right to the school scene.
School
6) In the top of the tree
to the right of the school, you will find a paper with Greg's locker combination
(Manny may have dropped it.)
7) To follow Manny into the school, you have
to use the round garbage can and the seesaw (teeter-totter). Push the can onto
the left side of the seesaw, then carefully climb to the right side. If you jump
up and land again on the seesaw, the can is thrown to the school building ledge,
and you can slide it farther left to jump from, to enter. Chase Manny to the
first floor. (You can also jump from the tree after getting the combination, if
you already moved the can.)
8) As you read on his journal page, Greg's
locker is supposed to be 5 lockers from Holly Hill's, while Chirag Gupta's
locker, with a cut lock, is only 2 away. This is an error by the artists. Greg's
locker is 5 from Chirag Gupta's and 7 from Holly Hill's, making it the
8th locker overall from the left. At any rate, it is the only one you can open.
9) Go to the locker and turn the dial. As you reach each number, it
automatically turns back the other way. Get the Twisted Wizard guide and leave
the school.
Leisure Towers (South Street)
10) Go right from
the school and you are on South Street , where Grammie Heffley and Grandpa
Heffley have separate condos. Neither will answer their door (Grandpa is
asleep). Climb the outside of the building and up to the window at Grandpa's,
which is 33-C (* if you stay on the far right of each of the ledges for the C
windows, you can climb without being hit at all).
11) Talk to Grandpa
Heffley, and he has you share his watercress salad for lunch. You must rapidly
click on your avatar to keep from throwing up the salad. (see glitch below)
12) You will see Manny on the security monitor feed. He has swiped a motorized
chair from a resident.
13) Exit at right and take the elevator to the lobby
(L). Go out and right to Whirley Street.
Whirley Street
14)
The four teenage hoodlums are pelting you with snowballs. Dodge them and get the
snow shovel (* if you jump up while being hit, the snowballs can knock you up
onto the building, and you can jump across to the house).
15) Head back to
the left, all the way to Greg's house.
Greg's House and Surrey
Street
16) Go to where Greg is playing the video game. Click "examine"
on the game guide to show him how to win. Then click on the TV monitor he's
using and you will play the game.
**Beating Twisted Wizard - on the game
Start screen, click the Wizard to enter easy Mode. Use the blocks to surround
your Wizard, which can be roated with the spacebar. Then click once on the mouse
to zap each attacking Ogre before it reaches you. Repair the wall and beat the
next two waves of ogres. (see related question)
Exit and go left to
Rowley's house to return the CD.
17) Near Rowley's house, use the carrot
nose on the snowman. It makes noises, and you discover that someone is trapped
in it. (You later find it's Fregley.)
18) At Rowley's house, his dad won't
let him out or you in. You have to jump on the dad's car, then quickly hide by
the bush to the left of the door. You can sneak in when he passes to see why his
car alarm is going off.
(* major glitch here in trying to hide
before the dad comes out)
19) Give Rowley the CD and rumble bike,
but get his Joshie membership card.
20) Back at Greg's house, use the card
to open the locked door, and shut off the power to Rodrick's room. When he
leaves in the diaper van, enter his room and get the bowl for Sweaty the dog.
21) Go outside, and get the leaf blower from the garage. Go left and use it
to blow the snow off the snowman, who turns out to be Fregley. He will give you
his bingo troll doll (Fredrick). Continue left to North Main Street.
Gramma's House (North Main Street)
22) Talk to Gramma, who
asks you to help clean her driveway of snow. Use the snow shovel to remove it
all (work quickly, and use long sweeping motions before lifting and dumping the
snow).
23) Gramma leaves to go to her Bingo Game at Leisure Towers. Go
there.
Leisure Towers
24) Enter the lobby and go to where
Gramma is playing bingo. Use Fregley's troll doll as a card marker. As the
numbers roll out, quickly mark the numbers on all three of your cards. When you
win the game, you get a Classical Music CD.
Main Street - Fast
Mart
25) Go to the Fast Mart, where the owner is complaining about the
teenage kids hanging around. Play the music CD in the player by the door (you
may have to turn the volume up). The teens will all leave and the owner lets you
have some "No Freeze" windshield wiper antifreeze. Go back to the right of the
School scene where the snowplow is parked.
School - Snowplow
Truck
26) The driver needs his wipers de-iced. You need to measure
exactly 4 liters, using the 10 liter bottle, the 5 liter cup, and the 3 liter
dog dish. (Fill the dog dish, then pour into the cup; fill the dog dish again,
leaving 4 liters in the bottle). Go back to Greg's house.
Greg's
House and Laundromat
27) Open the blinds to get Greg to stop playing the
game. He suspects that Manny is looking for his blanket ("Tingy"). Exit Greg's
house.
28) Follow Manny, who is driving the snowplow truck down the street.
Go to the Quick-Spin Laundromat. There you should find Manny on the floor with
his blanket.
29) Go with Greg to push the giant snowball to knock out the
Whirley Street Kids, and then sled home (point the cursor and click to jump the
bullies). You arruve just in time as Greg's mom comes home. Greg gives you the
Island Medallion for all your help.
Glitches:
* Some
players may experience trouble with the Rowley's scene, #18 above. The good news
is that the graphics load was reduced after complaints, so most people will be
able to hide behind the bush before Mr. Jefferson comes out the
door.
* Once you start climbing Leisure Towers, there
is no way down except thru Grandpa's room 33-C. Once inside, you cannot go back
out the window.
* A glitch, or perhaps a fix, is that
if you minimize your browser window while eating Grandpa's icky salad, you do
not have to click to keep from throwing up. Not looking at the lunch for about a
minute seems to work.
* At Greg's House, you have to
beat Twisted Wizard. This was not originally part of the island. You can play
the game from the Games menu of your item bag.
Wimpy boardwalk
Wimpy Boardwalk is the 28th island of Poptropica. It was
released for general play on July 18, 2012. It follows the characters from the
"Diary of a Wimpy Kid" book series during a day at the beach and boardwalk. Once
again, Greg Heffley needs help, this time to recover his vacation money from
some taunting teens.
The setting includes four sections of the Boardwalk :
Car park, Fun House & Rides / Main Street Games / Arcade / Beach
*^ this is set out in correct order of which way each place is from Main street
1. Greg Heffley
and Rowley Jefferson are with Rowley's parents at the Boardwalk. Greg's $20 bill
blows away and is picked up by two teens, who run off with it. If you follow
them, they get away. To play the games, you would need tokens and you cannot get
any in this area.
2. Head left to the Ride Area. There are a few scattered
tokens to be found, including at the Popcorn Vendor and Fun House (you can get
more by repeatedly entering and leaving). There is a trash can with stinging
flies that you have to jump over. In the parking lot, talk to the woman who has
lost her car keys.
3. Climb the Cranium Shaker ride and bring down the
Trash Can lid. Go past the Bumper Cars and put it on the open can. Push the can
*all the way to the right* until you reach the Cotton Candy. Open the lid and
the flies go to the candy.
4. Sort through the trash until you uncover the
Empty Popcorn Bag at the bottom. You can get a free refill from the popcorn
vendor.
5. Head all the way right to the beach. Although you have a few
tokens, you do not have to play any games right now.
6. On the
beach, get some free sunblock from the man taking photos. Take it to the large
sunburned guy near the water and give it to him. He will give you some oily
lotion that he doesn't want.
7. Go to the woman under her umbrella and use
the popcorn, which spills and attracts small seagulls. The birds chase the woman
away.
8. Talk to the man with the metal detector, who is looking for
something lost in the sand (you cannot help with this right away).
9. There
is a walkway under the Boardwalk which is not used until the end. Climb the
stairs back up onto the Boardwalk, where the teens are tricking people, and
taunting Greg, by sticking his $20 bill up through the boards.
10. Go right
to the beach again. There will be a seagull carrying something as he flies over.
Jump up from the trash can to grab it. It is a keychain that has a photo of the
man with the metal detector.
11. Return the keychain and he will give you
the metal detector. Using it reveals a patch of sand near the umbrella. The
detector flashes when it is near metal, and under the blanket you will find the
missing car keys.
12. Use the detector again to find some tokens for the
boardwalk games. You can find as many as you want, but you will probably only
need about 15 or 20. As you pass near one, the detector blinks, then turns green
when you find it. Click the green spot to pick up a token.
13. Go back to
the boardwalk and *all the way left* to return the keys to the woman, and she
will give you some flip flops. You will need these for the hot roof of the
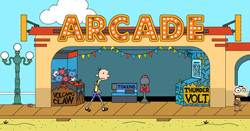
Arcade. Go back there.
14. At the arcade, the kid has lost his Flying Disk
(frisbee) on the arcade roof. Put on the flip flops and climb up to get it for
him. Give him the frisbee and he tells you how to get a free game at the broken
Volcano Claw Machine.
15. Go to the claw machine and wiggle the handle,
then use the claw to pick through the items. You just position the claw and drop
it to pick up the items. The only thing that you eventually get (4th thing you
pick up) is the Fake Vomit.
16. Take the Fake Vomit back left to the Bumper
Cars, and use it there to get rid of the line of kids waiting to ride. You
should see Rowley on the cars.
17. Drive the bumper car to run into Rowley
in the red car. After you hit his car a few times, he drops his Lucky Rabbit's
Foot. Pick it up and exit.
18. Go left to the Fun House, where you again
find Rowley, who is stuck in the little kids' slide. Use the Oily Suntan Lotion
to get him unstuck. He will slide down into the ball pit and uncover Fregley,
whose mom gives you some leftover Fish Sticks.
19. Head back right to play
all 5 of the Boardwalk games on Main Street.
-- Himalayan Hurl : now
that you have Rowley's lucky rabbit's foot, you will win every time. In fact,
you can never beat it without the rabbit's foot.
-- Fastball Fury :
throw two balls fairly fast (above 80), then the third ball faster, near the top
of the slider. The correct choice for your guess should be really fast (above
90).
-- Circus Soaker : aim the water bursts to hit the small hole
in the clown's mouth, filling the water balloon above it. It will expand and
then burst. The trick is to aim ahead of the movement of the face. Progress too
slowly and you will lose.
-- Space Fling : Click and hold on a ring,
then lift (move up with your mouse) and release. The ring will fly through the
air and hopefully land on one of the 4 bottles. This takes only a little
practice, as you only need to score one ring to win.
-- Pirate Panic
: Click and hold on a baseball, then lift (slide mouse upward) and then release
to hit the bottles. This can be done in one throw if you are accurate.
20.
Winning all 5 games gives you the Bonus Prize, a large plush caterpillar.
21. Go left to the Cranium Shaker and swap the Bonus Prize to the man for the
Remote Control Helicopter. Take it back to the Beach at far right.
22. Use
the Fish Sticks to add one to the hook on the helicopter. Fly the helicopter to
the shore and hook the Crab that comes out of the water.
23. Go back to the
boardwalk where the teens are still using the $20 bill. Use the helicopter to
drop the crab onto the $20 bill, so the teens cannot pull it back down through
the boards.
24. Go with Greg below the boardwalk to chase the teens. Greg
gets his $20 back and rewards you with the Island Medallion.
Glitches:
-- Rowley is in the Ball Pit of the Fun House until you get the Fake
Vomit, when he appears at the Bumper Cars. Some walkthroughs show you getting
the Fish Sticks first somehow.
-- If you continue to talk to the guy who
swaps the Jumbo Prize for the Helicopter, you will just keep getting more and
more of the Helicopters! Similarly, you can win multiple copies of the prizes
for all the games.
BONUS QUEST (Members Only) - Play
Thunder Volt
Someone has put a 2nd place score on the Thunder Volt
game, where Greg had scored 10,000,000 points. The score table reads "Greg
Heffley" and then "Is an Idiot." Play the game to get a score above 800,000 and
save his reputation. To win the game, shoot as many complete sets of attackers
as you can to build your firepower, and kill the bosses as they appear. The
problem is that you cannot move at the same time you are shooting, so shoot and
move quickly. The game puts a great premium on NOT GETTING HIT because
hits reduce your firepower and can (eventually) kill you. The final (5th) boss
is a giant spider who is actually the easier of all of them to kill. It is
better to stay on the lower half of the screen when fighting him, as rocks fall
through from the top. You can
get a score of between 1,000,000 and
3,000,000 points or more.
*Note: if you need tokens here, go to the Bumper
Car game (lots of tokens in about a minute)
released for general play on July 18, 2012. It follows the characters from the
"Diary of a Wimpy Kid" book series during a day at the beach and boardwalk. Once
again, Greg Heffley needs help, this time to recover his vacation money from
some taunting teens.
The setting includes four sections of the Boardwalk :
Car park, Fun House & Rides / Main Street Games / Arcade / Beach
*^ this is set out in correct order of which way each place is from Main street
1. Greg Heffley
and Rowley Jefferson are with Rowley's parents at the Boardwalk. Greg's $20 bill
blows away and is picked up by two teens, who run off with it. If you follow
them, they get away. To play the games, you would need tokens and you cannot get
any in this area.
2. Head left to the Ride Area. There are a few scattered
tokens to be found, including at the Popcorn Vendor and Fun House (you can get
more by repeatedly entering and leaving). There is a trash can with stinging
flies that you have to jump over. In the parking lot, talk to the woman who has
lost her car keys.
3. Climb the Cranium Shaker ride and bring down the
Trash Can lid. Go past the Bumper Cars and put it on the open can. Push the can
*all the way to the right* until you reach the Cotton Candy. Open the lid and
the flies go to the candy.
4. Sort through the trash until you uncover the
Empty Popcorn Bag at the bottom. You can get a free refill from the popcorn
vendor.
5. Head all the way right to the beach. Although you have a few
tokens, you do not have to play any games right now.
6. On the
beach, get some free sunblock from the man taking photos. Take it to the large
sunburned guy near the water and give it to him. He will give you some oily
lotion that he doesn't want.
7. Go to the woman under her umbrella and use
the popcorn, which spills and attracts small seagulls. The birds chase the woman
away.
8. Talk to the man with the metal detector, who is looking for
something lost in the sand (you cannot help with this right away).
9. There
is a walkway under the Boardwalk which is not used until the end. Climb the
stairs back up onto the Boardwalk, where the teens are tricking people, and
taunting Greg, by sticking his $20 bill up through the boards.
10. Go right
to the beach again. There will be a seagull carrying something as he flies over.
Jump up from the trash can to grab it. It is a keychain that has a photo of the
man with the metal detector.
11. Return the keychain and he will give you
the metal detector. Using it reveals a patch of sand near the umbrella. The
detector flashes when it is near metal, and under the blanket you will find the
missing car keys.
12. Use the detector again to find some tokens for the
boardwalk games. You can find as many as you want, but you will probably only
need about 15 or 20. As you pass near one, the detector blinks, then turns green
when you find it. Click the green spot to pick up a token.
13. Go back to
the boardwalk and *all the way left* to return the keys to the woman, and she
will give you some flip flops. You will need these for the hot roof of the
Arcade. Go back there.
14. At the arcade, the kid has lost his Flying Disk
(frisbee) on the arcade roof. Put on the flip flops and climb up to get it for
him. Give him the frisbee and he tells you how to get a free game at the broken
Volcano Claw Machine.
15. Go to the claw machine and wiggle the handle,
then use the claw to pick through the items. You just position the claw and drop
it to pick up the items. The only thing that you eventually get (4th thing you
pick up) is the Fake Vomit.
16. Take the Fake Vomit back left to the Bumper
Cars, and use it there to get rid of the line of kids waiting to ride. You
should see Rowley on the cars.
17. Drive the bumper car to run into Rowley
in the red car. After you hit his car a few times, he drops his Lucky Rabbit's
Foot. Pick it up and exit.
18. Go left to the Fun House, where you again
find Rowley, who is stuck in the little kids' slide. Use the Oily Suntan Lotion
to get him unstuck. He will slide down into the ball pit and uncover Fregley,
whose mom gives you some leftover Fish Sticks.
19. Head back right to play
all 5 of the Boardwalk games on Main Street.
-- Himalayan Hurl : now
that you have Rowley's lucky rabbit's foot, you will win every time. In fact,
you can never beat it without the rabbit's foot.
-- Fastball Fury :
throw two balls fairly fast (above 80), then the third ball faster, near the top
of the slider. The correct choice for your guess should be really fast (above
90).
-- Circus Soaker : aim the water bursts to hit the small hole
in the clown's mouth, filling the water balloon above it. It will expand and
then burst. The trick is to aim ahead of the movement of the face. Progress too
slowly and you will lose.
-- Space Fling : Click and hold on a ring,
then lift (move up with your mouse) and release. The ring will fly through the
air and hopefully land on one of the 4 bottles. This takes only a little
practice, as you only need to score one ring to win.
-- Pirate Panic
: Click and hold on a baseball, then lift (slide mouse upward) and then release
to hit the bottles. This can be done in one throw if you are accurate.
20.
Winning all 5 games gives you the Bonus Prize, a large plush caterpillar.
21. Go left to the Cranium Shaker and swap the Bonus Prize to the man for the
Remote Control Helicopter. Take it back to the Beach at far right.
22. Use
the Fish Sticks to add one to the hook on the helicopter. Fly the helicopter to
the shore and hook the Crab that comes out of the water.
23. Go back to the
boardwalk where the teens are still using the $20 bill. Use the helicopter to
drop the crab onto the $20 bill, so the teens cannot pull it back down through
the boards.
24. Go with Greg below the boardwalk to chase the teens. Greg
gets his $20 back and rewards you with the Island Medallion.
Glitches:
-- Rowley is in the Ball Pit of the Fun House until you get the Fake
Vomit, when he appears at the Bumper Cars. Some walkthroughs show you getting
the Fish Sticks first somehow.
-- If you continue to talk to the guy who
swaps the Jumbo Prize for the Helicopter, you will just keep getting more and
more of the Helicopters! Similarly, you can win multiple copies of the prizes
for all the games.
BONUS QUEST (Members Only) - Play
Thunder Volt
Someone has put a 2nd place score on the Thunder Volt
game, where Greg had scored 10,000,000 points. The score table reads "Greg
Heffley" and then "Is an Idiot." Play the game to get a score above 800,000 and
save his reputation. To win the game, shoot as many complete sets of attackers
as you can to build your firepower, and kill the bosses as they appear. The
problem is that you cannot move at the same time you are shooting, so shoot and
move quickly. The game puts a great premium on NOT GETTING HIT because
hits reduce your firepower and can (eventually) kill you. The final (5th) boss
is a giant spider who is actually the easier of all of them to kill. It is
better to stay on the lower half of the screen when fighting him, as rocks fall
through from the top. You can
get a score of between 1,000,000 and
3,000,000 points or more.
*Note: if you need tokens here, go to the Bumper
Car game (lots of tokens in about a minute)
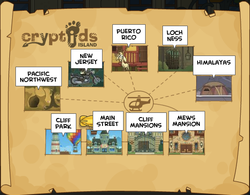
the cryptids
---
Cryptids Island is the 16th island in
Poptropica, with a release date of January 18, 2011. Early Access was available
to paid monthly members beginning December 20, 2010. A preview of one section
was available prior to release.
* Cliff Park /
Main Street / Mansion Row
Main street consists of three buildings :
Bert's Bed and Breakfast (multiplayer room), the General Store, and Kitty's
Kites. To the left is Cliff Park and to the right is a row of mansions,
including the home of billionaire recluse Harold Mews. You receive a flyer
announcing the Mews million-dollar reward for proof of the existence of cryptids
: legendary creatures whose existence is unconfirmed by fact.
- At the General Store, everything is too expensive (but have no prices on
them). You could get a free kite at Kitty's, but the most interesting, the
KiteSurfer X-250, does not have any nylon rope to use. Continue right to the row
of mansions. The Mews mansion is gated and locked, but you can find $5 in the
tree just before you get there. His gardener is overworked and thirsty. - Use the $5 to buy a sports drink at the General Store and give it to the
gardener, who will loan you his shears. Take them left, past Main Street to
Cliff Park. - Help the other adventurers on their way. Give the hang glider a push and use
the shears to cut loose the hot air balloon. You will get some nylon rope. - Go back to Kitty's Kites and get the KiteSurfer. Take it to Cliff Park and
launch it into the waves. You will surf for awhile until evil Gretchen Grimlock
shoots a flare into the kite, leaving you to flounder until you are rescued by a
helicopter owned by Mews.
* Mews
Mansion and Museum, and the Cryptid Hunt
You are recovering after your
rescue, and Mews offers to help you in the hunt for evidence of the Cryptids.
Drink the last of your medicine and follow him to his Museum and Laboratory.
After you familiarize yourself with the creatures, he lets you use his
helicopter to travel to locations around the world. Exit the house and go to the
Heliport. Your first stop should be Loch Ness, because you will need items from
there at other locations.
- Loch Ness (Nessie) - The ticket counter for the Rowboat and Submarine
is closed, but you can view the loch from the hill above, using the binocular
telescope. - Help the man whose truck is stuck under the bridge. Let some air out of the
tires to lower it. The driver will give you his Digital Camera. Continue right
to the Pub. - In the Pub, pick up the book of matches from the bar.
- Play darts against the players there. If you win, you get a Rowboat Ticket.
(to throw, aim at the center and "pull back" -- lower your dart -- between 1/2
and 3/4 of the way to the dartboard edge, then release) Eventually you will win
and get the ticket. - Go left to the Loch and take the Rowboat ride. While on the loch, you will
get a photo of some "humps" in the water. You could return to the Mews Mansion
with it. But to save travel, you can continue on to the rest of the four sites,
beginning with the Himalayas.
At the Himalayas,
there is a base camp set up, and you meet another fortune hunter. But none of
the guys is going to help you up the mountain in search of the Yeti. The
monastery at the top of the mountain has the alleged scalp of a Yeti. Begin
climbing left until you meet a helpful Sherpa guide.
- With the Sherpa, climb the mountain using the Rope Anchors. As you go up,
you must tie off the rope at each of the round anchors along the way, and wait
for the Sherpa to catch up. (Even if you don't slip, the play is extremely
glitchy.) Avoid slipping, and don't move until he ties up. - At the mountain-top monastery, go in and talk to the head monk. He will not
give you the Yeti scalp, because it is a sacred artifact. - He does give you a lantern, which you can light at any time with your
matches. - Leaving, you climb the mountain at left, and meet another monk who will
challenge you to a simple game of Hunt The Yeti (fox and hounds), which you must
win to go further. To win, move toward the hunters, then back and to one side,
and eventually one will make a mistake and let you reach the left side. The monk
lets you pass. - Go down the path, climb the temple, and go up and left higher on the
mountain. At the upper left, you will find a clearing with flowers blooming.
There is a large footprint that might have been made by the Yeti. Take a photo,
then go back down across the rope bridge to return to the helicopter. The next
stop is Puerto Rico.
In Puerto Rico, the farmers
and goat herders are concerned about losing livestock to the Chupacabra (goat
sucker). The farmers rescue another of Gretchen's victims from a tree. He offers
to let you use his jeep to drive around the countryside. As you drive, you find
yourself splashing through streams, knocking down fences, and scattering herds
of goats.
- In the jeep, drive up the road to the first "star" on the map (middle
right). This is the herder's brother, who shows you some fur left on his barbed
wire after an attack. It is supposedly from the chupacabra. Collect it from the
fence. - The second star (top left) has a resident who says that the Chupacabra
prefers spotted goats. You can see them nearby. If you climb the springy poes to
the right, there is a Bolt Cutter at the top. - The third star (center) is Snaggletooth rock, where three spotted goats are
sure to attract the Chupacabra. - At the fourth star (middle left), the resident says that the Chupacabra only
attacks goats when there are three of them. This will figure in your ability to
pursue the creature. But for now, you can leave and head for New
Jersey.
In New Jersey you are looking for proof of
the existence of the Jersey Devil, sort of a small, demonic-looking flying
dragon. You land at a gas station in a wooded area near the interstate highway.
- Enter the restroom to find claw marks and other evidence of the Jersey
Devil. Writing on the wall outside and inside gives you clues. - If you collected the bolt cutters at Puerto Rico, you can open the dumpster
at the gas station. Inside is the removed toilet door. When placed next to the
other door inside, it gives complete (if roundabout) directions to the house in
the forest : right, left, left, right, right, right, left, left. - As it is dark in the woods, use the Matches to light your Lantern.
- Hop on the motorcycle parked nearby and drive into the woods. Follow the
directions on the list you wrote, or just alternate, right then left turns, to
reach a cul-de-sac deep in the woods, where you park. - Walk up the path to the deserted house and go inside. There are noises from
above. - Climb the stairs and push the dresser over to reach the attic, where
thumping sounds are being made. You see a dark, red-eyed shape emerge from a
barrel, but find that it is only a raccoon. Pick up the grappling hook next to
the raccoon barrel and head downstairs. - Just when you are leaving, the Jersey Devil appears in the window!
- Unfortunately, you can't get a photo. Go outside, where you see the Jersey
Devil again. Apparently it has a nest in a tall tree. - Use the grapple to reach the nest and recover pieces of egg shells from the
it. You now have evidence on all 4 creatures, so return to
Mews.
* Back at Mews Museum
Laboratory
You show your collected materials to Mews, and use the DNA
Analyzer to test the samples.
- Unfortunately, the Nessie photo is only tires in the water, but there is a
suspicious shadowy form in the background. - The photo of the Yeti footprint turns out to be from a snowboot, so you can
cross off the Himalayas as a source. - Using the DNA analyzer shows that the "Chupacabra fur" is just a
coyote's. - But you do confirm one of the four : the Egg Shells are definitive
proof of the unknown DNA of the Jersey Devil.
Now you have
to return to Loch Ness and to Puerto Rico to see if anything new can be found.
At Loch Ness, you confront the rowboat guide about the fake photo. He leaves,
and you have the rowboat for your use. Return to the pub for more conversation
and more darts. One of the two players claims to have seen Nessie
- Play darts against his skeptical friend to win a Submarine ticket.
- Go back to the loch and take the Submarine tour. You will descend into the
loch and get a photo of a "Nessie" on the bottom. It looks suspiciously like a
hoax. - Back at the pub, the players confirm the hoax. The first dart player you
beat returns for a rematch. But when you win, he refuses to give you
anything. - However, the bartender gives you a Pennywhistle that is rumored to attract
Nessie. - Return to the Rowboat and go left, then farther left into a small cove.
- Blow the pennywhistle and a huge Nessie will emerge from the water!
- Take a photo and return to the helicopter. (You can return later to show up
the haughty dart player and display your astounding photo.) You now see what you
can find back in Puerto Rico.
In your absence, the goat
herder has decided to catch the Chupacabra. Take his jeep to his brother's house
again, where he suggests you use the jeep to corral three spotted goats into the
rocks (center star on map) as bait for the chupacabra.
- Drive over, and steer around the three spotted goats until they are all
between the rocks. - Get out and meet the goat herder, who has a plan to trap the creature in a
huge wooden box with locks and chains. - After a short wait, his "trap" succeeds, and the Chupacabra is caught!
- Unfortunately, as you push it toward the truck, the box bursts open,
releasing the savage Chupacabra, who knocks you down and escapes! - Fortunately, he has lost a tooth in the process. Pick it up and head back to
the Mews mansion with proof for both Nessie and the
Chupacabra.
* Mews Museum
Laboratory and the Bigfoot Hunt
- The photo confirms that Nessie exists.
- The Chupacabra tooth confirms it is a real creature
- This leaves only the Yeti / Bigfoot unproven.
But Mews
has word of a sighting in the Pacific Northwest, so you fly the helicopter there
to investigate. This is a new, 5th location on the helicopter's GPS. You sight
Bigfoot travelling on the ground through the trees, and he is occasionally
getting out of your sight as he roams. You can spot his footprints for a few
seconds before they fade away.
- Fly above him and keep him in view for about two or three minutes until he
reaches some caves. - You report in to Mews, but Gretchen has bugged the radio, and swoops in
using her own copter, and traps Bigfoot in a cage. Fly in close to her to stop
her. - Jump from your copter to hers, avoiding the rotor blades. If you fall, you
can try again. To stop her, you have to open her copter's gas tank, on the side
near the door. This will spill out the fuel and force her to ditch the
helicopter. - Quickly jump down to the cage and use the shears to cut the connecting rope.
Descend to the ground safely using the cage's
parachute.
* Mews Museum (Finale)
- The existence of Bigfoot is finally confirmed, and you are the winner of the
million-dollar prize! But Mews has had financial trouble, so he hasn't any money
to buy the caves as a Bigfoot preserve. - You decide to turn down the money to keep the Bigfoot safe. :-(
- But you have confirmed all 4 of the cryptids and win the Island
Medallion!
--
Notes
:
1) You can use the shears to trim some of the hedges, much to the
dismay of the rich lady. Fortunately, the damage disappears when you leave the
mansion.
2) You can fly another kite any time on the island, but not
the surfer kite. Like the balloons on Counterfeit Island, they let you jump
higher.
3) After you see the cryptids, they do not appear again on the
island. You can examine the caves where Bigfoot is staying.
Counterfiet

The object is to prevent the theft of priceless paintings from the Island
Museum.
(Game released to Early Access on December 21, 2009 - to all on
January 4, 2010)
The solution (includes spoilers)
Arriving on the Island
You may wish to tour the island before going to the museum. The areas include
the Docks, the Museum and Main Street, Downtown, and the Countryside. The
valuable painting "The Scream" by Edvard Munch is due to be exhibited at the
Museum Fantastique (this is a French island, but mostly they speak English). It
is daytime when you arrive and you have a chance to look around. At night,
Downtown is closed for construction and repairs.
Downtown /
Countryside
1) There is a pair of large trash cans near the
Underground Tunnel Tour. If you dig through the one on the right, you will find
a pair of tickets to the Tour. But you decide to return them to their proper
owner if possible.
2) There are free balloons in Bobo's Clown Store,
and they will lift you high into the air when you jump. This makes the few
building climbs easier. Take a green one to the Countryside for a crying boy
there. (Oops! He's off!)
Main Street / Museum
3) Return to Main Street and check the news coverage at the Internet Cafe. The PONG game
there is addictive, but if you press the old guy, you will find he is the
rightful owner of the Tour tickets. He will give you one.
4) Look on the upper right of the Moldy Baguette Inn to find an odd scrap of paper, part of
a torn picture of some sort of dragon. (There are 5 more pieces to find.)
5) Take the Underground Tour, which includes some skeletons and
coffins. Inside a domed arch, you will find another of the odd dragon picture
pieces. There is some sort of special hatch leading up to somewhere. The exit is
to the Docks on the far left of the island.
6) Talk to the shady guy at
the exit, and get the 3rd piece of the torn picture behind him. The 4th piece is
on top of the ship.
Museum Fantastique (Fantastic Museum)
7) Go to the
Museum (to your right) and see the female Chief Inspector in front. Climb up to
get the 5th dragon picture piece on the roof.
8) Enter the Museum and apply for a job. The assistant curator tests you with four sets of paintings,
each a different style. Pick the paintings that don't belong and move them to
the right category. (The middle one at Upper Left goes to the right at Upper
Right, that one goes to the right at Lower Right, that one goes to the middle
Lower Left, and that one goes to the middle at Upper Left.)
9) Take the tutorial for Forgery Detection. Use the X-ray to spot the painting with the
older artwork underneath. Use the magnifier on three paintings to spot the
different signature. The moonlight photo shows stars through the Moon. For the
paint test, click the color that lights up in the frame during each timed test :
oil, watercolor, and pastel. (1st is Green-Red-Blue-Red, 2nd is
Red-Green-Blue-Blue, 3rd is Blue-Red-Blue-Green.)
10) Get your key to the supply room. Go through the Statue collection and to the Security Office to
examine the video surveillance equipment. Go to the Supply Room, where you will
find the last piece of the dragon face.
Night Time at the
Museum
11) Leave the museum, and go left to the City Docks, and see
the guy you met earlier. He wants you to stop the theft of the painting "The
Scream". Enter the underground and make your way to the secret tunnel to the
surface.
12) Solve the dragon face lock by arranging the 8 facial
features to match the picture.
13) Enter the Supply Room and unlock it.
Slip past the Security Window and out into the Statue Room.
14) Avoid the lasers by hiding behind the statues until it is safe to move, enter the main
hall. The door to the museum is locked, so there is nowhere to go. Take up a
protective position near the painting in the upper gallery. You will click on
the painting or the light above it. (Uh oh! You have tripped the alarm! You are
arrested!)
Next Day (In the Jail)
15) Take a lie detector test with the Chief Inspector, who tells you that the painting was actually
stolen later in the night.
16) You return to the museum to see if the
thief is on the surveillance video.But it is too long. Go to find the security
guard who was on duty. All of the townspeople think he needed cheering up, and
sure enough you find him in the Clown Store. He has his timecard showing when he
wasn't in the gallery hall.
17) Back at the museum, discover that the
shady guy was the crook, and print his photo to show around town. Although no
one seems to know him, the Ship Captain suggests you ask the mimes about him.
When you do, they just whistle. This suggests he is in the All That Jazz Cafe
(although if you look there first, he's not).
18) Confront the Shady Guy, and chase him through the streets on the motor scooters. Try not to wreck,
although you can't catch him anyway and he escapes by boat. Pick up a key card
he dropped, which has a Black Widow on it.
19) Back at the museum, you have a package waiting that contains information. By x-raying the painting of
the Starry Night, you will find a message from the Museum Fantastique's curator,
who is on Early Poptropica Island.
Off to Early
Poptropica
20) Take the blimp to Early Poptropica and go to the Art
Museum. You meet the curator who says that a famous thief is threatening the
world's greatest artwork. She gives you a key to some unknown lock, and you
return to Counterfeit island to search.
In the
Countryside
21) Go to the mysterious locked cottage of the
Inspector, who is probably intended to be the Chief Inspector (the sign is
supposed to say "Veuve Noire" - Black Widow in French). The key from the curator
fits the door!
22) Inside are a locked chest (a dummy item) and a
strange painting. The sidewalk artist said that he had done a painting for the
Chief Inspector but without a frame. Peel back the corner, and it's the stolen
"Scream" from the museum.
(Lights go out and you are noisily subdued.)
In the Lair of the Black Widow
24) You are tied up and questioned by the Black Widow, notorious art thief (it's the lady Inspector, but
you saw that coming). She leaves, and you talk to the shady guy, who turns out
to be her henchman, who she has now betrayed. Scoot yourself backward in your
chair, so you can get untied.
25) Enter the guarded room, move along the lower level to pass the guards, then climb back up behind one of them. You
can now jump up as a female guard turns away, trailing her quietly until you
reach the large chair at far right. Springing onto it, you reach the top door.
26) The Black Widow key card opens the door and you and the shady guy
confront the Widow. Go to the large cranked lift at far left to get Shady Guy up
to catch her.
27) Before you can get there, the Widow begins trashing
valuable artwork from her loot. You will have to save the art from destruction
at the same time as you crank the handle to raise the lift. Jump up to catch it,
as she throws four pieces at a time. After each set of four, she throws small
bombs down to distract you, so you can only spend part of that time cranking the
lift up. If the value of lost items goes over $1 million, you have to start
over. After about 8 or 9 sets of items, you should have the lift fully cranked.
28) Shady Guy (probably hoping for a lighter sentence) captures the
Black Widow, and the game is over.
The passageways are open to the
surface now, and the curator meets you at the museum to give you the Island
Medallion! (The museum had cleverly hidden priceless art behind phony walls.)
More to come soon!
